This stage introduces the Tersus Studio.
You will learn how to create a new Tersus project
On completion of this stage you should be familiar with the following concepts:
|
Modeling notions: |
Model, Display, Template. Model vs. Element Name. |
|
Modeling techniques: |
Creating & managing the display. Renaming a model. |
|
Useful display templates: |
View, Button, Popup, Label, Text area. |
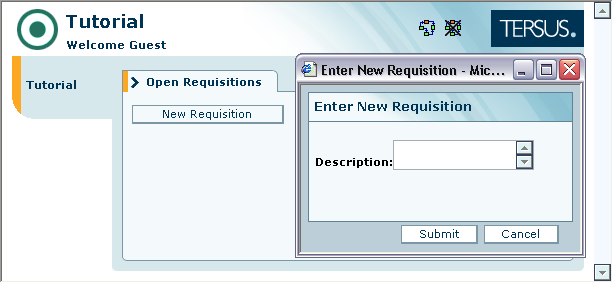
In this stage you will model a browser form for entering requisitions.
The resulting web application will include a button that opens a pop-up form used to enter a new requisition, similar to the following:
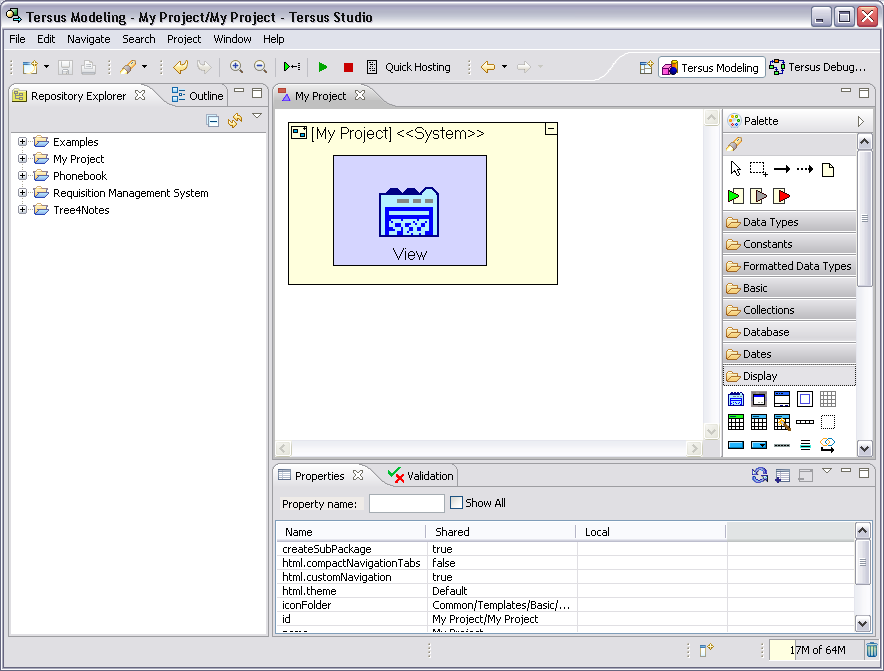
The following screenshot displays the default appearance of the Tersus Studio. It includes the Model Editor (with integrated Palette) on the right, and a tabbed view containing the Repository Explorer and Outline on the right.
If you want to learn more on the Tersus Studio before starting your first project, refer to Appendix A, which covers the following topics:
Tersus Studio and the Eclipse Platform
The Palette
Inserting New Elements to the Model
Selecting, Moving and Resizing Elements
Drill-down
Zoom-in/out
Undo/Redo
The Outline
The Repository Explorer
The Application Server
We start by creating a new application project:
Select File -> New ->
![]() Tersus Project.
Tersus Project.
Note that Tersus Project is the first option in the New sub-menu, followed by Project..., which is a generic eclipse option (see Appendix A for more information).
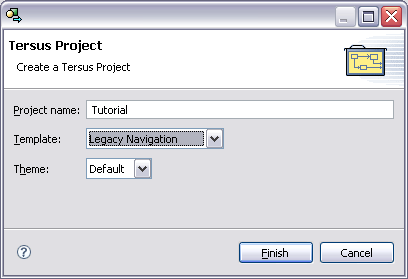
Enter a Project name for your new project: Tutorial.
Select the Template: Legacy Navigation
Press the Finish button.
To start modeling we need to open the application root model in the model editor.
If you've just created a new project, Tutorial, it should already be open in the model editor. If not, do the following:
Locate the Tutorial project root (folder) in the Repository Explorer view, and double-click it.
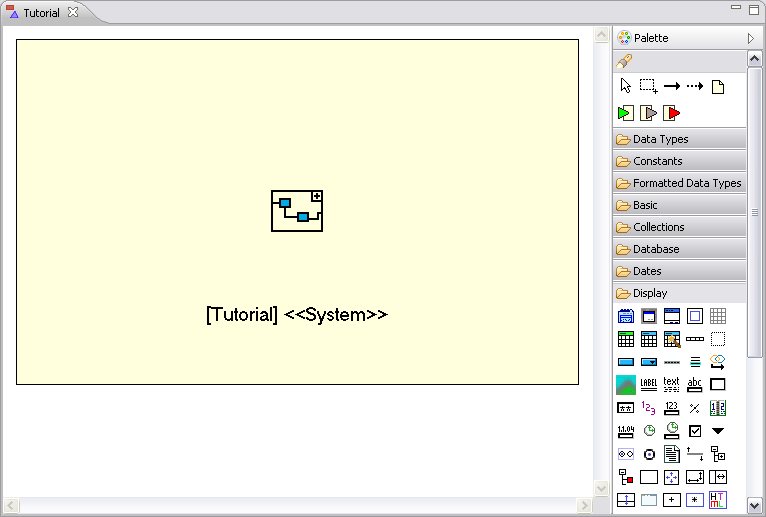
This should open a new editor window, which should look as in the following screenshot, displaying a yellow rectangle, representing the application. Since we have not modeled anything yet, the rectangle is empty, except for its name:
A web application is something you can see in your browser, so first we need to define a View. A View model defines what is displayed in the browser, and contains other display elements (labels, buttons, tables, etc.).
To create the View called Open Requisitions (showing all your open requisitions), do the following:
In the Palette (to the right of the model editor), make sure that the Display category is open (if it is not, just click it to open).
Click on the
View template (![]() )
to select it.
)
to select it.
Notice that when you now move the mouse pointer over the editor, it changes to signify where it is legal to drop View (by displaying a small, gray rectangle).
Position the mouse pointer inside the Tutorial root model and click to insert the view.
A view model is created, with the default name View, and the editor enables you to rename it immediately, as follows:
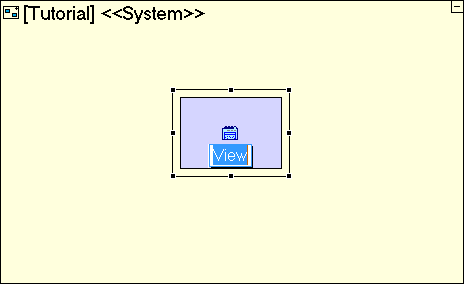
Type Open Requisitions and press [Enter] when finished.
If the
editor exits name edit mode before you have changed it, you can rename
it as follows:
1. Make sure the view model is selected
2. Open the Rename
dialog by pressing [F2]
(or right-click -> Rename)
3. Enter the new name , Open Requisitions,
in the Element name
(local): field
4. Click Finish
For more details regarding rename and the Rename dialog, see the Rename a model section of this stage, below.
The simple model you have just created should be similar to the following:

The Open Requisitions view (the green/blue rectangle) is now a sub-model of the root model Tutorial (the yellow rectangle).
Any model in the hierarchy may contain any number of sub-models.
Note that the model screenshots
provided in this tutorial may differ from the models you create,
mainly because of differences in positioning and sizing of elements
in the model, as well as the fact that elements which contain other
elements may be expanded (marked with![]() )
or collapsed (
)
or collapsed (![]() ).
This difference does not have an effect on application functionality,
except in the case of display models, as explained later in this
stage.
).
This difference does not have an effect on application functionality,
except in the case of display models, as explained later in this
stage.
Let's continue with the modeling of the Open Requisitions view. We will now add a New Requisition button (allowing the user to enter a new requisition in a popup form).
Select the Button
template (![]() )
from the Display
category in the palette (by clicking on the template).
)
from the Display
category in the palette (by clicking on the template).
Insert it into the Open Requisitions view (by clicking inside Open Requisitions).
Name it New Requisition (Type New Requisition).
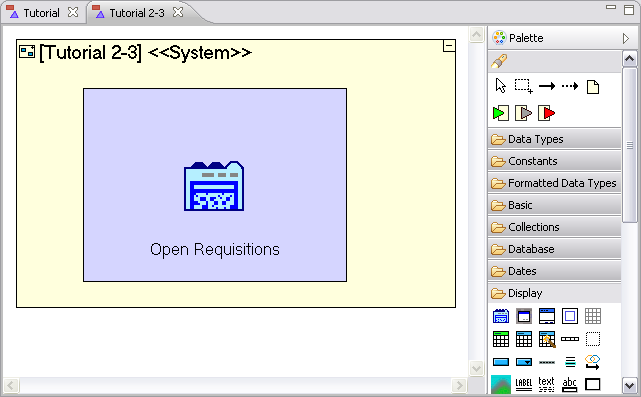
The model should now look similar to the following:
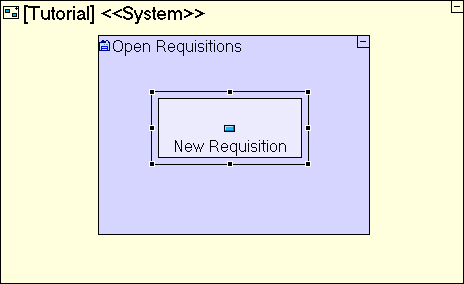
Both the Repository Explorer and the Model Editor captions display an asterisk next to them (e.g. *Tutorial). This indicates that the latest changes have not been saved.
Save your work by clicking
![]() on the toolbar.
on the toolbar.
Whenever you save your model, the Tersus Studio checks (validates) your models. If any errors are found a message will appear, and the errors will be displayed in the Validation view. See Completing Stage 12 for more details regarding validation.
Although we have modeled very little, we can already have the first glimpse of our application in the browser:
Click on the Launch the application button in the studio's main toolbar to load your application in the embedded Tersus Server and open it in a web-browser.
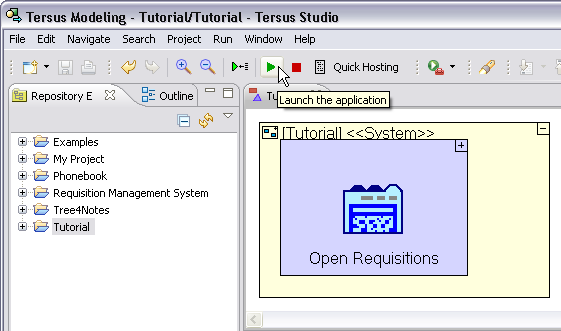
If the Launch the application button is disabled, clicking on the model editor should enable it.
Your browser should display a page similar to the following:
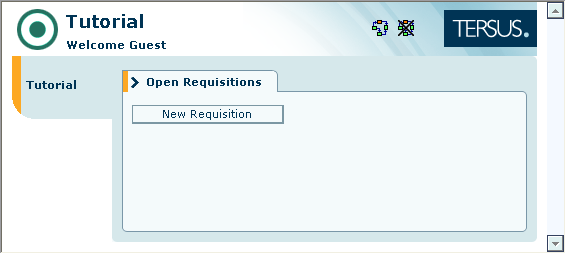
Notice that the Open Requisitions view appears as a single tab. Later on, when you insert additional views, they will appear as additional tabs. Inside the view, we see the New Requisition button.
Switch back to the Tersus Studio. You may leave the browser open in the background.
People often wonder what happens in the computer when they press a button. It would be nice if we could look through the button and see the insides of the application's logic, and this is exactly what Tersus let’s you do by using a “zoom in” technique – modeling "within" the button the actions that take place when the button is pressed.
So let’s zoom into the New Requisition button and model the popup form that appears when the button is clicked:
Double-click the New Requisition button to zoom into it.
Select the Display/Popup
template (![]() )
from the palette.
)
from the palette.
Insert it into the New Requisition element.
Name it Enter New Requisition.
Your New Requisition button model should now look similar to the following:
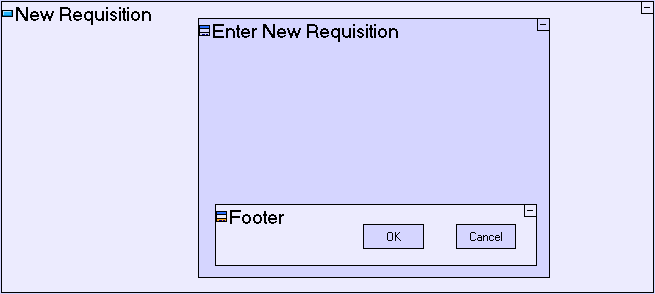
The Popup template is an
example of a template which provides additional pre-built
functionality out of the box.
In the case of a Popup
the pre-built functionality consists of:
1.
A Footer, which will
cause its contents to be displayed at the bottom part of the popup.
2.
An OK button, which does nothing at the present.
3. A Cancel
button, which contains a Close Window model,
so that when Cancel is pressed the popup will close
In general, you are free to change
(or remove) this functionality as you see fit.
Save your work
![]() .
.
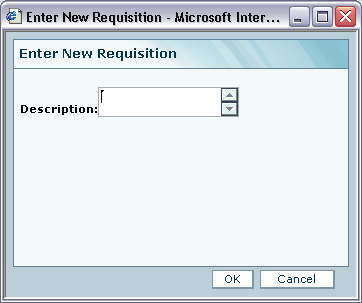
Now let's see how your application looks when deployed in the browser:
Switch back to the browser.
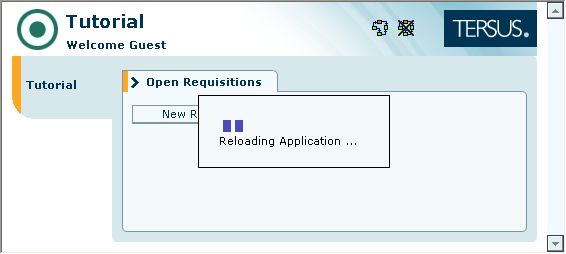
The browser recognizes that the application has changed since the last time it was loaded into browser and reloads the application automatically.
Once reload has finished, press the New Requisition button
You should see the following:
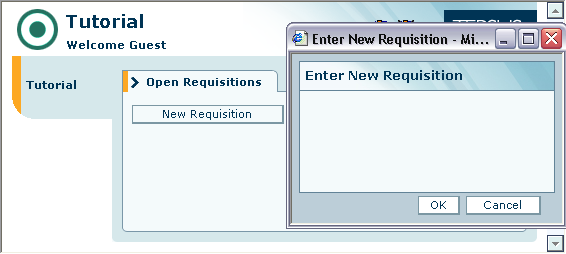
Click the Cancel button to verify that it does close the popup as expected.
We need a place for the user to type the requisition details, and this should suffice to begin with.
First, create a label (“Description:”), which prompts the user to describe the requisition:
Double-click the Enter New Requisition popup to zoom into it.
Select the Display/Label
template (![]() )
and drop it into the upper part of the popup. Name it Description:
(the colon being part of the name).
)
and drop it into the upper part of the popup. Name it Description:
(the colon being part of the name).
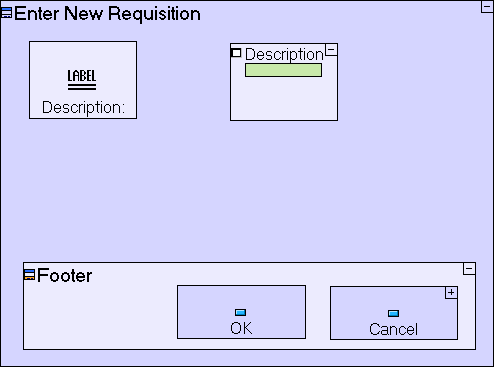
Next, insert a text area element in which the user can type the description of his/her requisition:
Select the Display/Text
Area template (![]() )
and drop it to below the label. Name it Description.
)
and drop it to below the label. Name it Description.
Your model should now look similar to the following:
Save your work, and switch back to the browser.
Your popup should look as follows:
Note that the order by which
display elements appear in the form is determined by the relative
positions of the corresponding sub-models in the popup’s model.
In general, the order is governed by a top-to-bottom, left-to-right
rule (as if reading English).
More generally, the way display
elements are arranged in the model hierarchy defines how they show on
the screen. We have already seen two different examples:
1.
Placing a popup inside a button causes the popup to appear when the
button is pressed.
2. Positioning display elements next to each
other (inside a parent model) defines the order in which they are
displayed on the screen.
The Enter New Requisition popup contains the pre-built button, OK, which we shall use in the next stages to submit the new requisition. Let's rename it accordingly:
Zoom to the OK button in your model.
Next, either
Right-click it and select Rename from the menu.
or
Click to select the model, and press [F2].
This will open the Rename dialog:
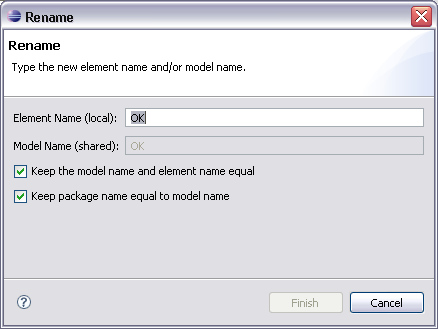
Enter Submit replacing OK, and click Finish.
The Rename
dialog is used to specify two different names for the model element
you are renaming, an Element Name
and a Model Name.
Model Name is the shared
name of a reusable model (see Stage 4 for further details
regarding reuse). A model name must be unique in a given package.
Element Name is the local
name of a model. An element name must be unique in a given parent.
In the case of display models (such as the View
we have just created), the element name is the name which will be
displayed to the user.
Usually,
the names are identical, and in these cases, the Keep the
model name and element name equal
check-box is checked by default so that both names are changed
simultaneously.
There are however, situations in
which a certain element or model name cannot be used, and in these
cases you may decide to uncheck the check-box, and set different
names. For further details, see the discussion regarding
automatically generated names in Stage 14.
The
Keep package name equal to model name
check box appears when the model you are renaming has the same name
as the package containing it. It is checked by default, but you may
clear it if you do not wish to rename the package.
Your model should now look similar to the following:
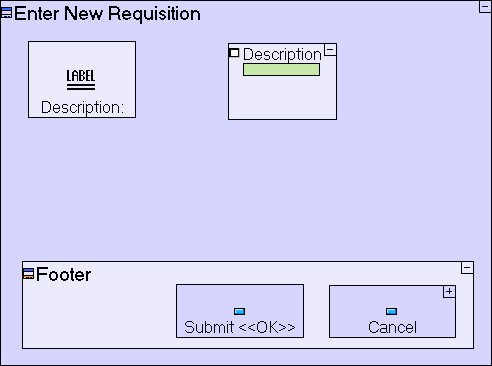
The button we have renamed, still displays its original name in angled brackets (<<OK>>). This is a reminder that the button originates from the Popup template. It has no real effect, and will not be displayed at runtime, therefore you may ignore it.
Save your work, and switch back to the browser.
Your popup should look as follows:
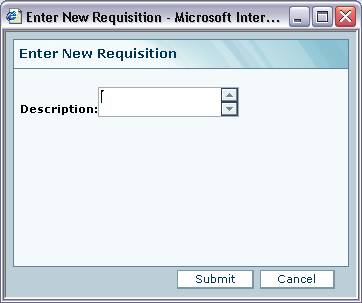
We have completed modeling of the form, however pressing the Submit button does not save the data anywhere. We shall handle this in the next stage.
We shall now import a ready-made sample project, Tutorial 2-3. This sample project contains all the functionality modeled thus far, and will serve as the basis for the next stage of the tutorial:
Select File|![]() Import… to open the Import wizard.
Import… to open the Import wizard.

Select
![]() Existing Project into Workspace as the import source.
Existing Project into Workspace as the import source.
Click Next>.
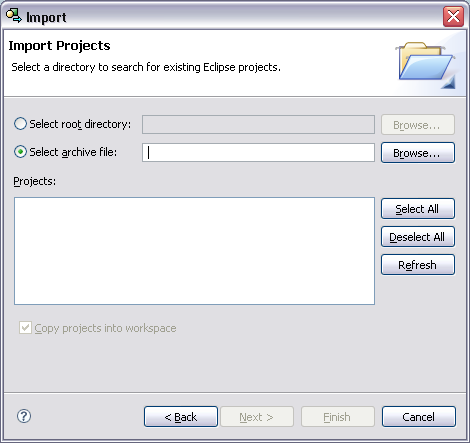
Make sure the Select archive file: radio button is selected, and click the Browse… button to open the Select archive containing the projects to import dialog.
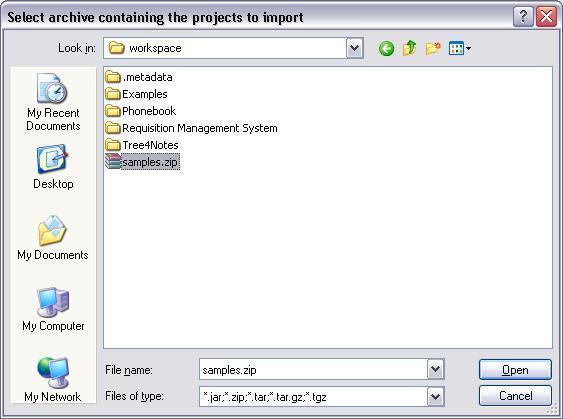
By default the dialog should open in the workspace folder which contains the sample project archives.
Select (or double-click) the samples.zip archive.
Note the following:
The samples.zip
archive contains sample projects for all stages of the tutorial. You
can import as many samples as you wish, but it is recommended that
you import only the sample you need (Tutorial 2-3
at this stage).
The full path of the archive you
selected may be different, depending on the location in which you
installed Tersus.
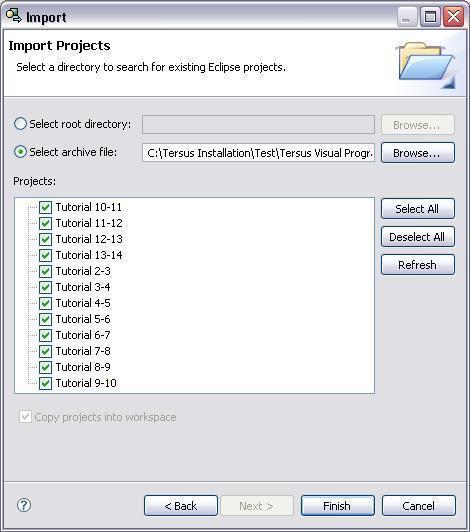
Click the Deselect All button.
Check the check box next to the Tutorial 2-3 project.
Click Finish to import the project.
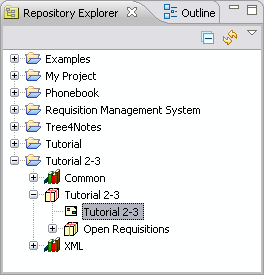
The wizard will import the project, and add it to the Repository Explorer.
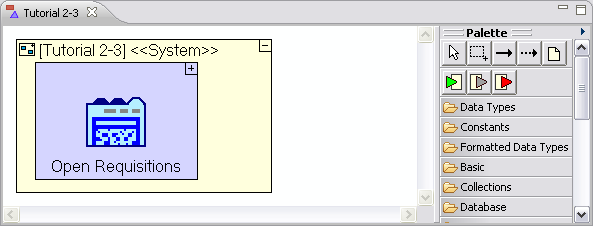
Double-click the Tutorial 2-3 project to open its root model in the model editor.
Alternatively, expand the imported
project, Tutorial 2-3, and the Tutorial 2-3 package
found in it, and double-click the . root model in it.
Doing this will open the model in a new model editor window.
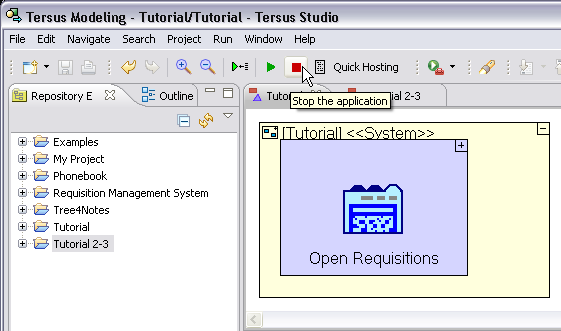
Note that the project you previously worked on, Tutorial, is still open for editing in a separate model editor appearing as the left-most tab, in the screenshot above), and in the application server.
Switch back to the Tutorial model editor, by clicking on the Tutorial tab.
Click on the Stop the application button in the studio's main toolbar to unload your application from the embedded Tersus Server.
Close the browser window running the application.
Close the Tutorial model editor by pressing the Close button on the editor's tab:
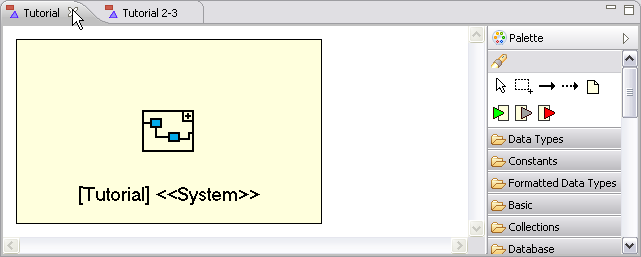
The model editor should now look as follows:
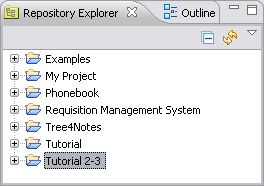
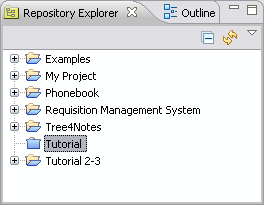
It is also recommended that you close the (old) Tutorial project you created at the beginning of this stage:
In the repository explorer, right-click the Tutorial project.
Select Close Project from the menu.
The repository explorer should look similar to the following:
You may now proceed to Stage 3, in which we will implement a process which saves the submitted requisition to the database.
Click here to open the live project in a separate window.